STARRETT NEWS & EVENTS
Frequently Asked Questions on the Starrett Combination Square
Probably the most asked question concerning the combination square is when it was invented. Company records tell us that Laroy S. Starrett began the invention of the improved try square in 1877 but was finally successful in acquiring his patent for the try square or square head as we now call it, on February 26 1879, so going by that official date that makes the tool 142 years old in 2021.
The Center head was next on June 29th 1880 and the last was the Bevel or Protractor as we know it today on October 24th 1883.
Fast forward to today: Present day squares are available in two materials, Cast Iron or Hardened Steel, Starrett differentiates the two styles by catalog numbers: The cast tools being our Catalog 11 family while the steel being our 33.
Are the tools manufactured in the U.S.A.? Yes, the squares and scales/rules are manufactured at our facility in Athol, Massachusetts.
What is the tools accuracy? Advertised accuracy of a 12-inch combo square is .0015 in 12 inches. The protractor is accurate to 15 minutes of a degree.
Why the two materials? If you consult a Mohs scale of hardness chart, you will see that in the world of metals, cast iron is relatively soft in that if you were to rub a piece of thin sheet metal along its body the cast iron would show a scratch and its accuracy would not last long. So why do we even bother to offer cast iron? This material is fine if used by the woodworker. The cast material will not suffer any damage if reasonable care is taken to protect the tool. It would have a Rockwell C scale of around 25 if inspected.
The second option is the Hardened Steel tools these are recommended for the Do It Yourselfer as they typically will work one day with wood and the next day might be a piece of metal, which as explained above might be damaged. The hardened tool is a more expensive alternative being that it is heat treated and precision ground. As a point of interest Its Rockwell hardness is between Rockwell C scale of 58-60.

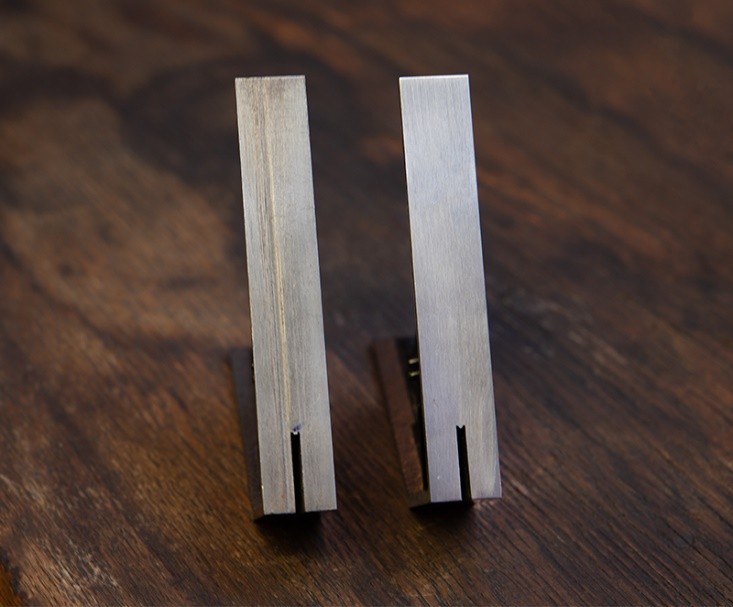
Construction: All combination heads regardless of their size are constructed providing three planes, a vertical surface that is the actual squaring surface in relation to the blade, a shorter length square base that contains the slot and blade seat that the blade rides on and a second arm providing a 45-degree angle, it is this seat that allows slight adjustment to the tools squareness if the blade is ever found out of square slight filing of the raised seat will reestablish the tool to square. Note: square bodies are calibrated to be square to the inserted blade they are not designed to be used away from the blade in a stand-alone situation.
Blades or Scale that accompany the Combination Squares: When consulting the Starrett catalog, in respect to the variety of graduation patterns available, a breakdown of the description should be explained: the last digits in the catalog number will tell you the graduations provided on that scale or rule 4R or 16R. (To ease the explanation for this exercise we will concentrate on the English blades only the metric tools will be available later.) as previously shown the two variety of blades available are listed as 4R or 16R the 4R being the more popular having 8 th ,16ths. 32nd and 64ths of an inch and the 16R with 32nds ,64ths 50ths and 100ths of an inch provided and more appreciated by the aircraft industry. Our blades are chemically etched steel, hardened to a Rockwell C scale of 44-46 C.
Sizes: Combination Squares are available in four sizes, the smallest being the 4-inch tool. Sold alone as just the head it is listed as H11-4 or H33-4 ( easily explained as H for Head , the 11 or 33 telling the material and -4 the size that being the 4 inch tool ) if purchased with a rule as a set they are listed as (11H-4-4R, C11H-4-4R being the cast iron tools With standard steel rule or as the letter C denotes a Chrome plated rule) or (33H-4-4R. C33H -4-4R being the hardened steel variety again the C telling us the chrome rule is provided) used by hobbyists or fine woodworkers the head itself is 2 ¼ inches tall by ¾ inch across the base and the 45-degree arm is 1 ¾ inches long it gets its name from the fact that it is available with a four-inch-long rule( and rules were discussed earlier). Note the tool is only able to hold the 4-inch-long rule.
NOTE: the 4-inch tool does not come with a scriber or spirit level
Next larger would be the 6-inch tool, if purchased alone it would be designated as H11-6 or H33-6 when sold with a rule (11H-6-4R or C11H-6-4R, 11H-6-16R C11H-6-16R) like the tool above this 11 tells us it’s the cast style) or the (33H-6-4R, C33H-6-4R, 33H-6-16R, C33H-6-16R) being the hardened steel. You will note there are more varieties of rules available expanding the grads on the rules.
The head dimensions are 3 inches tall with a base of 1 inch and the 45-degree arm 2 inches long. Again, like the tool above it only accommodates the 6-inch-long rule. The tool comes with a scriber and spirit level.
Third on the list is the most popular of the combination heads the (if purchased alone) H11-1224 or H33-1224. to explain the breakdown the H again stands for Head the 11 or 33 the material and the 1224 tells me the tools head is capable of using rules 12 inch up to 24-inch rules (Starrett now offers combination blades up to 48 inches long that fit this head - see the catalog or website) above we listed all the combinations available for the head and blade the 1224 has so many variety’s that it will take a very long paragraph to explain the them all. So, to be brief, repeat the numbers used above. An example is the cast head with most popular 4R blade it would be the 11H -12-4R or the C11H-12-4R (remember the C stands for Chrome blade) so if you want the head with the 18-inch 24 inch substitute the blade length in the center of the catalog number. 11H-24-4R or 16R. The tool comes with a scriber and the spirit level
Last on the list is the largest head available, this being the Catalog 8 tool. This oversized head and center head are available with their own special rule for use with large parts. Unlike the tools previously listed, the catalog 8 is only available in cast iron, with a 24-inch-long rule with its 4R grad pattern. The head has a length of 8-3/8 long with the 45 degree being 5 ¼ in length.
Center Heads: This attachment is available for all the combination sets explained above, this tool is used on the rule without the square head installed and helps to find the center of a round object. Place the head on the scale/rule and place its arms against the round object with the scale across the face of the circle and using a pencil draw a line along the edge of the scale on the part being inspected. Now reposition the center head around 90 degrees and again draw a line intersecting the previous line the point where the two lines touch is the center of the shaft. Note: if you construct many lines and they don’t seem to all intersect at the same point don’t panic many times the part being inspected is not round and this will cause the lines to shift slightly.
Like the combination heads the center heads are available in cast or hardened steel. They are defined as:
- C11-4(center head cast iron 4-inch size) C33-4(center head hardened steel 4-inch size)
- C11-6(center head cast iron 6-inch tool) C33-6(center head hardened steel 6-inch size)
- C11-1224 (center head cast iron 12-48 inch) C33-1224(center head hardened steel 12-48 inch) each leg is 2 ½ inches long
- C8 Cast iron center head for catalog 8 large square each leg is 4 ¼ inches long
Protractors: These tools are constructed of cast iron only. They are not available as hardened steel products. They are available in two styles: Reversible and Non-Reversible. The difference between the two tools is the base. The reversible tool has the base bisected with a slot to allow the blade to be installed this provides a base to set the tool on then reverse it 180 degrees and set it back in place the blade. Then is in the opposite direction, while the non-reversible tool does not have this bisected base the blade /rule is mounted in front of the protractor scale and rotates in front. They are available with different paint finishes: Wrinkled black to shiny smooth black so as to match the balance of the components of the set.
Combination Square Sets: Starrett offers the combo kits as sets or sold as separate parts allowing you to build the tool as you require. The text above lists the separate components if you desire to purchase the tool complete with all four components, I hope this section will help.
As explained above the sets are available in Cast Iron or Hardened Steel except the protractor, which is only available as Cast. When coupled with Hardened Steel in a set the finish on the tool is shiny black so as to match. If you want to order a cast set, they are listed in the catalog and on the website under the 435 series while the Forged and Hardened is the 434. The same letter designations detailed above should help you to understand the many sets available so as to order the correct tool. And with the sets the protractors are the reversible style.
Odds and Ends: The combination set comes to you on a red plastic foam rubber lined box with cut outs for the 4 parts. A wooden box is available as Catalog number 969.
Above I mentioned the 434 and 435 sets and both sets come equipped with the reversible protractor If the owner would be more comfortable with the non-reversible style then the catalog 9 sets is available an example is the 9-12-4R (all the components in the set area of cast iron construction).
Combination square blades come in standard steel or protected with a satin chrome plate, which makes reading the tool easier. and increases its protection from rust. When storing the tool for an extended period of time, an old machinist trick is to coat the exposed surfaces with a light film of Vaseline petroleum jelly.
Why is the blade not flush with the base on the protractor? With the blade installed in the protractor you might be concerned that it is not exactly flush with the tools base. The reason being is that the protractor is made of cast iron. If you are familiar with the casting process, you know that construction tolerances are expanded, most being in the range of plus or minus 1/16th of an inch. When the base is machined, to generate the flat surface there may be slight differences in the thickness of this base. Depending on the material available, some might be thicker or thinner. We are at the mercy of the rule’s construction relying on the center groove to the outer edge to be consistent. If we were to guarantee that every protractor would have the same distance from the center of the protractors graduated turret to the center of the rule groove the tools would be very expensive almost a ‘one off “every time.
How is the scriber held in place? Looking down at the scriber hole, you will notice a brass ring (resembling a bushing) pressed into the tool. This “bushing” is a bullet shaped part pressed into the tool with its rounded nose down, as the pointed scriber is pressed to the hole, the tapered end grasps the scriber's body to hold it in place.
What is the accuracy or the spirit level provided on the 1224 head? Sensitivity is 24--30 minutes. Elevation change per foot when the bubble moves 1/10 of an inch =.083-.104
In the field inspection: There are multiple methods to check the tools accuracy. The most common check for a combination squares head squareness is to place the head firmly up against the edge of a board with its rule across the width of the board. Using a pencil or the tools scriber trace a line along the edge of the scale across the board. Pick up the square and reposition the head “flipping “it over and scribe a second line parallel to the first. If the two lines are not parallel then adjustment to the seat is required. The problem with this method is the dependence on the boards edge to be straight, as the head is not in the same spot.
A more professional inspection requires the use of three same sized squares. Take three tools and designate them square one, two and three. Take two tools, number one and two and place them on a known flat surface with the rules/ blades vertical and reversed so the blades touch. Using a pen light flashlight or a piece of white paper behind the blades inspect them for light showing.
- Remove tool number one and set tool number three in its place recheck for light showing between two and three.
- Remove number two and place number one in its place and now compare one to three
- If any error is found remove and readjust
The lock bolt: One of the most interesting parts of the combination square is the lock bolt assembly. Without this part, the versatility of the tools would have been compromised. The lock bolt itself is a threaded shaft with a right angled "tang" visible when looking down the blade slot. The rule has different graduations on its two sides and the side in use is controlled by the blade slot locking in the lock bolts "tang". The balance of the assembly consists of three other components - the nut, the spring, and the special washer. It is this washer that is important in allowing the scale /rule to be reversed allowing the different graduation patterns to be put to use. By unscrewing the nut so as to allow this special washer freedom to disengage from the two “cut outs “in the frame. Reversing the washer’s points back into the slots causes the lock bolt tang to reposition 180 degrees thereby allowing you to slide the scale/rule back in place showing a different graduation pattern.
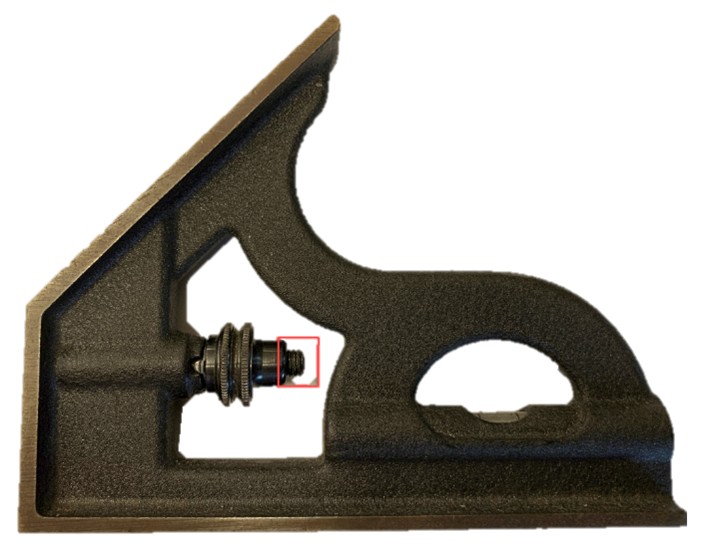
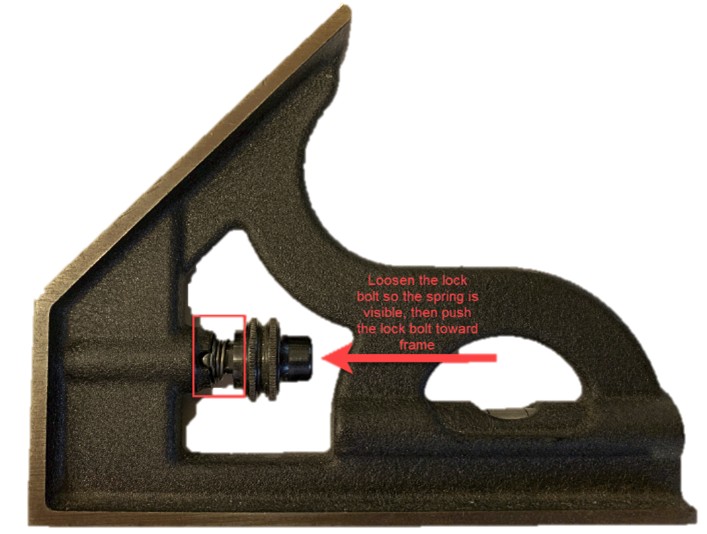
Re-Inserting the blade in the Square Head: If you are having trouble re-inserting the blade, ensure the lock bolt is loose enough. The first image shows a lock bolt with is too tight to insert a blade. Notice the threads sticking out beyond the lock nut. This second image shows what your lock bolt likely look would like when it is loose enough. You’ll see the small spring pushing the nut way from the square head. To re-insert the blade push the lock bolt back toward the square head to compress/hide the spring. Tighten the lock bolt after the blade has been re-inserted and set at the desired position. 

