STARRETT NEWS & EVENTS
Automating Part Measurement, Data Collection Processes
Accurate gages, produced from quality materials, carefully manufactured and rigidly inspected, to ensure lasting dependability are a requirement for precision measurement applications – a must in every machinist’s and inspector’s toolbox. Gages have evolved throughout the years beginning with mechanical, then electronic models, and now convenient wireless electronic versions have come on the scene. Each type has an important place in today’s quality control and inspection processes.
The first precision gages were mechanical, featuring analog readout and are still widely used today. For linear and round measurements, gages and tools that are used vary with the size of the dimension, the nature of the work and the degree of accuracy required. Over the last several decades, electronic gages were introduced offering digital readout and the ability to acquire measurement for data collection purposes and for Statistical Process Control (SPC), analysis and documentation. These types of gages make readings faster and easier for every machinist, regardless of experience.
.jpg?sfvrsn=a5790d43_3)
Electronic gages are capable of transmitting data through cables or wireless without cables, to collection devices to provide a permanent record for SPC, which is required for many industries today. Properly used, the data collected can provide printouts for analysis and can help a machinist’s control process, as well as predict and prevent out-of-tolerance conditions. Relatively recently, wireless precision gages were introduced which can be used as a gage only, or within an advanced data collection system such as Starrett DataSure® 4.0. When collecting measurement data automatically with an advanced data collection system, manual errors are eliminated, ensuring data accuracy and traceability. Accurate measurement data provides assurance for the end user and insurance for the manufacturer. By using wireless tools and an advanced data collection software system, the data can be efficiently integrated into ERP/ MRP programs.

For example, in a controlled, 100% inspection test to measure the impact of Starrett DataSure® on throughput and quality assurance, Starrett made three measurements per part and recorded the data on 500 parts.
Methods 1 and 2 involve time-consuming hand movements to pickup and put down the tool in order to record data. Also, results can be uncertain due to the measurement value changing while being inspected. The slowest method (#1) required 29 seconds per part with many errors. Measurement with DataSure wireless data collection software is fast and direct, nearly five times faster than Method 1.
Method 1: Measure, Handwrite Results, Enter Data Remotely
- 37 time/ motion elements, 28.9 seconds per part
- 62 entry errors
Factors affecting accuracy and throughput:
- Measurement must stop so that the machinist or inspector can write down results
- Illegible handwritten numbers, mistakes noted but not corrected, data written in shorthand and inspector's misread by the transcriber
- Value can change when the gage/ tool is released
- Data entry errors at the PC
Method 2: Measure and Enter Results to PC
- 20 time/ motion elements: 15.3 seconds per part
- 4 data entry errors
Factors affecting accuracy and throughput:
- Alternating measuring and data entry caused errors
- Gage not seated correctly when released to key-in data
- Missed data entry, incorrect keystrokes, data entered into wrong cell
Method 3: Measure and Enter Results Directly with Starrett DataSure® Wireless Data Collection System
- 17 time/ motion elements: 6.6 seconds per part
- 0 entry errors
Factors affecting accuracy and throughput:
- Measurement technique is maintained
- No interpretation or memory errors
- Immediate, direct data entry eliminates errors
High Volume, Low Mix Small Parts Inspection
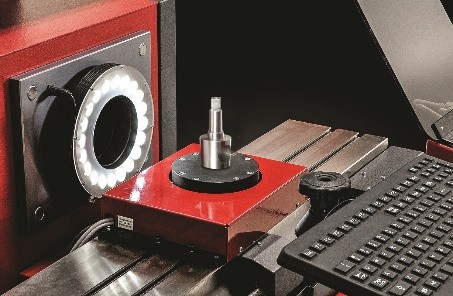
To complement handheld precision gaging practices, CNC digital comparators and vision systems which offer automatic pattern recognition can be extremely productive, especially for a high volume, low mix of parts. Pattern recognition is where inspection routines are created for workpieces based upon the master template, complete with tolerances. Precise stage motion and lighting control can be built in as programmable steps to ensure maximum repeatability. Once the program is created, an operator can place a sample on the stage and initiate the routine. When the routine is initiated, the system will automatically run the inspection, taking all relevant data points and providing accurate results in seconds.
Tremendous amounts of data can be collected quickly and easily from each part inspection in real-time and documented with date, time, lot number, job number etc. This removes potential operator error and provides comprehensive data for statistical process control (SPC) and traceability. With automatic pattern recognition, 100% inspection is possible, and inspection speed and output can also be dramatically increased due to automating the measurement process.
For example, Alpha Grainger Manufacturing Inc. (Franklin, MA U.S.A .) produces a high volume of intricate, small turned parts and more for a wide range of industries. The ability to capture part dimensions quickly and accurately is critical, while reducing labor cost and time. "Part features may need to be checked to ten-thousandths of an inch," said Mr. Grainger, "Parts can also have more than 20 features, such as on an automotive part, so our measurement solution needs to be fast, reliable and as automated as possible."
That's when the company found Starrett's Digital Video Measurement Systems, and today Alpha Grainger has 14 Starrett systems such as the HDV400. The HDV400 combines the best features of a horizontal optical comparator and a vision metrology system by using a uniquely mounted 5MP digital video camera, coupled with a choice of quick change telecentric lenses or 6.5:1 zoom for micron-level resolution. Using MetLogix M3 touch screen software, the HDV can import DXF CAD files over a network and make automatic 2D “go/no-go” comparisons to an engineering design by using video edge detection. Mr. Grainger said that, "On average, inspections are being done every 20-25 minutes so every bit of time we save using a semi-automated inspection process versus a manual one, increases our productivity."
# # # # #
